



3D Spausdinimo dervos ir medžiagos, Dažai ir kitos medžiagos
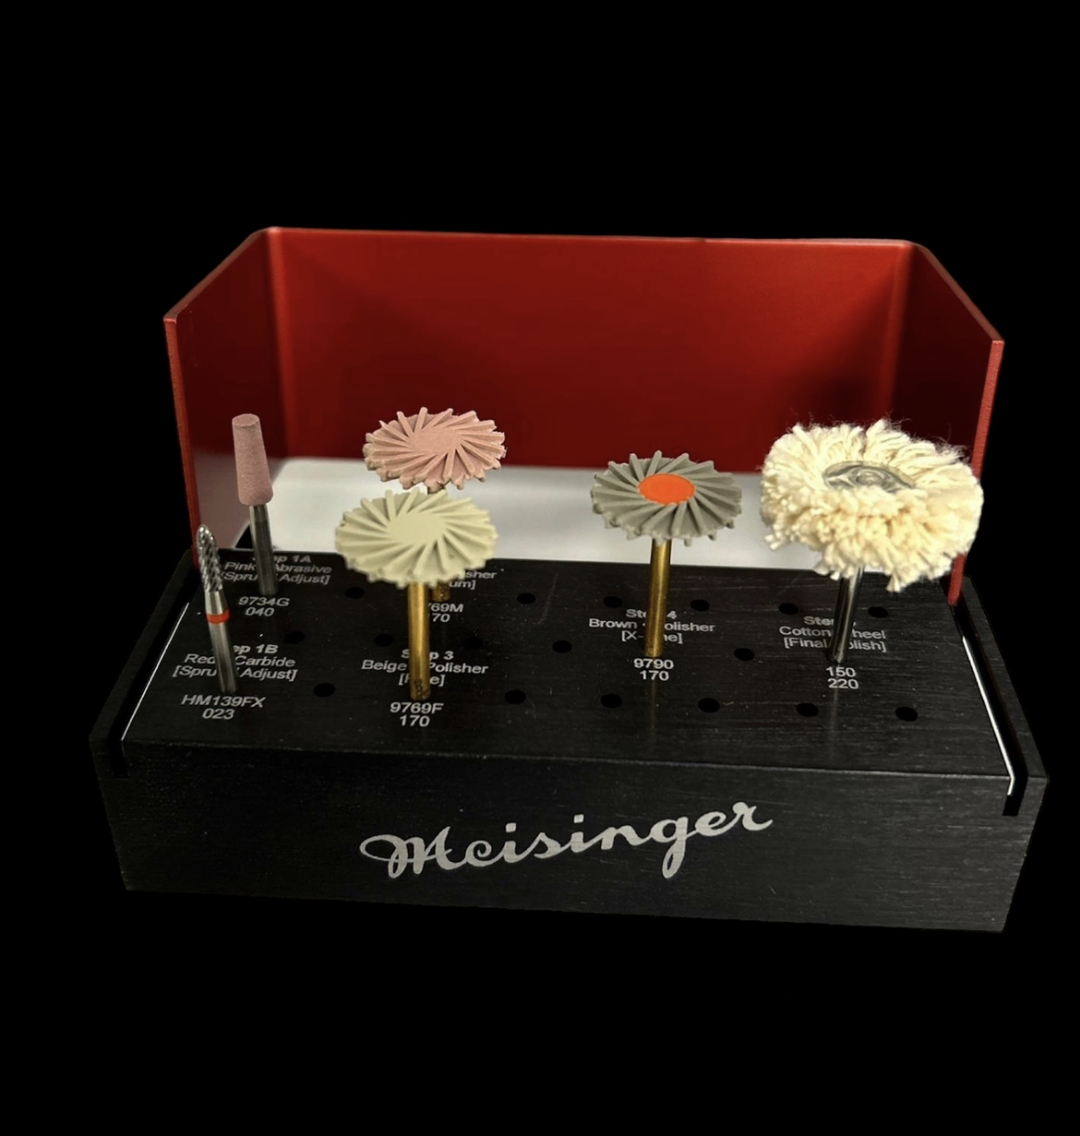
SprintRay Restorative Finishing Kit (SRI-0501107)
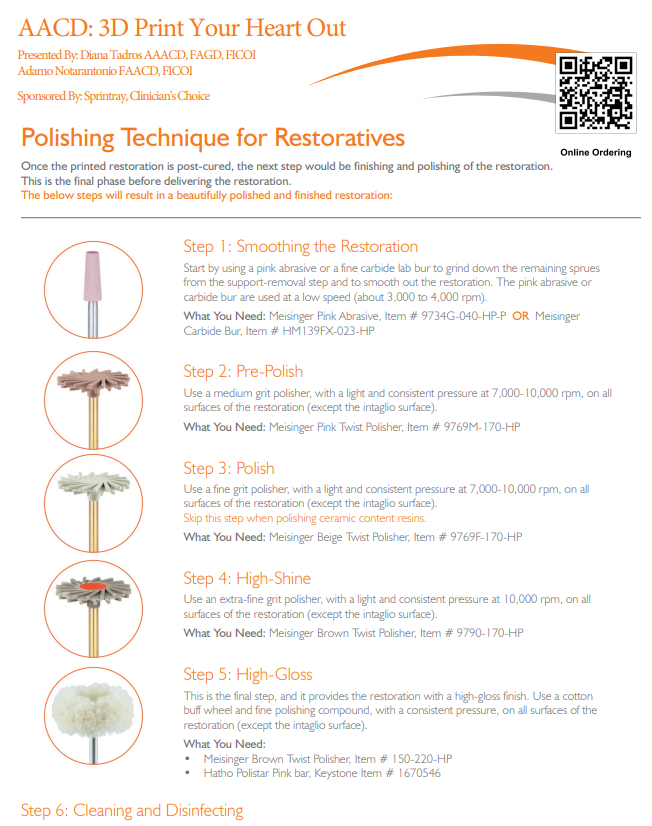
Polishing Technique for Restoratives
Once the printed restoration is post-cured, the next step would be finishing and polishing of the restoration.
This is the final phase before delivering the restoration.
The below steps will result in a beautifully polished and finished restoration:
Step 1: Smoothing the Restoration
Start by using a pink abrasive or a fine carbide lab bur to grind down the remaining sprues
from the support-removal step and to smooth out the restoration. The pink abrasive or
carbide bur are used at a low speed (about 3,000 to 4,000 rpm).
What You Need: Meisinger Pink Abrasive, Item # 9734G-040-HP-P OR Meisinger
Carbide Bur, Item # HM139FX-023-HP
Step 2: Pre-Polish
Use a medium grit polisher, with a light and consistent pressure at 7,000-10,000 rpm, on all
surfaces of the restoration (except the intaglio surface).
What You Need: Meisinger Pink Twist Polisher, Item # 9769M-170-HP
Step 6: Cleaning and Disinfecting
Before trying the restoration in the patient’s mouth, clean it, preferably with a steamer, followed by dish soap and a toothbrush.
Step 3: Polish
Use a fine grit polisher, with a light and consistent pressure at 7,000-10,000 rpm, on all
surfaces of the restoration (except the intaglio surface).
Skip this step when polishing ceramic content resins.
What You Need: Meisinger Beige Twist Polisher, Item # 9769F-170-HP
Step 4: High-Shine
Use an extra-fine grit polisher, with a light and consistent pressure at 10,000 rpm, on all
surfaces of the restoration (except the intaglio surface).
What You Need: Meisinger Brown Twist Polisher, Item # 9790-170-HP
Step 5: High-Gloss
This is the final step, and it provides the restoration with a high-gloss finish. Use a cotton
buff wheel and fine polishing compound, with a consistent pressure, on all surfaces of the
restoration (except the intaglio surface).
What You Need:
• Meisinger Brown Twist Polisher, Item # 150-220-HP
• Hatho Polistar Pink bar, Keystone Item # 1670546
Related products
-
3D Spausdinimo dervos ir medžiagos, Dantų modeliai
SprintRay Die & Model Tan II – 1 kg. (SRI-0202010)
 3D Spausdinimo dervos ir medžiagos, Dantų modeliai
SprintRay Die & Model Tan II – 1 kg. (SRI-0202010)
- Improved flexural modulus and strength
- Fantastic color and finish that mimics dental stone
- Easy to separate from thermoforming materials
SprintRay Die & Model 2 Tan represents a big step forward in dental 3D printing modelling materials. Our tan color mimics classic dental stone and features almost no pigment settling, which means you can spend more time printing and less time mixing. Improved adhesion to the build plate is matched by an increase in flexural modulus and strength, providing higher success rates and a reduced chance of breakage.
A reduced odor improves the quality of life for 3D printing models for an overall experience that your practice staff will love. Plus, Die & Model 2 resins are easier to separate from thermoforming materials, saving time and labor for more efficient in-office fabrication workflows. With rapid, repeatable results that are easier than ever to use, Die & Model 2 Tan is helping to bring dental 3D printing into dental practices everywhere.
* When printed on SprintRay Pro with Ludicrous Speed profile.
SKU: SRI-0202010 -
3D Spausdinimo dervos ir medžiagos, Bandomieji protezai
Keystone KeyDenture Try-In A1 – 1 kg. (KEY-4220401)
 3D Spausdinimo dervos ir medžiagos, Bandomieji protezai
Keystone KeyDenture Try-In A1 – 1 kg. (KEY-4220401)
Uses and Advantages
- Cost effective for try-in dentures
- Exceptional surface quality
- Easy to characterize
- Polishes to high luster
- Biocompatible medical device
- Free of MMA, BPA, and phthalates
KeyDenture Try-In™ takes the uncertainty out of the denture fitting process. Designed for precision and efficiency, KeyDenture Try-In is a photopolymer resin indicated for 3D printing of biocompatible, short-term trial dentures, intended for evaluation of fit, occlusion, esthetics, and phonetics during try-in appointments.
PROPERTY PROCEDURE KEYDENTURE TRY-IN Flexural Strength ASTM D790 56-68 MPa Flexural Modulus ASTM D790 1500-1750 MPa Water Sorption ISO 20795-1 9-13 μg/mm3 Elongation at Break ASTM D638 30-43% Biocompatibility ISO 10993 PASS SKU: KEY-4220401 -
3D Spausdinimo dervos ir medžiagos, Nuolatiniai vainikėliai, tiltai, užklotai/įklotai, laminatės
SprintRay Crown C2 – 500 g. (SRE-0205045)
 3D Spausdinimo dervos ir medžiagos, Nuolatiniai vainikėliai, tiltai, užklotai/įklotai, laminatės
SprintRay Crown C2 – 500 g. (SRE-0205045)
SprintRay Crown is a ceramic-filled hybrid material for 3D printing of single crowns, inlays, onlays and veneers. Easily finished and polished using traditional methods, this material offers excellent esthetics that conform to existing teeth.
High strength and wear resistance make SprintRay Crown a go-to material for restorative 3D printing. Because SprintRay Crown is FDA 510(k)-approved and meets all requirements for a Class II medical device, you can rely on this resin.
Crown is available in seven shades: A1, A2, A3, B1, B3, C2 and D3. Available in US, EU, UK and EFTA.
- Biocompatible, FDA 510(k) cleared and meets all requirements for a Class II medical device
- Versatile: Use as a single crown on a natural tooth or abutment, as an inlay, onlay or veneer
- A very low water absorption reduces the tendency to age, a smooth surface means less plaque formation
SKU: SRE-0205045 -
3D Spausdinimo dervos ir medžiagos, Nuolatiniai vainikėliai, tiltai, užklotai/įklotai, laminatės
SprintRay Crown A2 – 500 g. (SRE-0205041)
3D Spausdinimo dervos ir medžiagos, Nuolatiniai vainikėliai, tiltai, užklotai/įklotai, laminatėsSprintRay Crown A2 – 500 g. (SRE-0205041)
SprintRay Crown is a ceramic-filled hybrid material for 3D printing of single crowns, inlays, onlays and veneers. Easily finished and polished using traditional methods, this material offers excellent esthetics that conform to existing teeth.
High strength and wear resistance make SprintRay Crown a go-to material for restorative 3D printing. Because SprintRay Crown is FDA 510(k)-approved and meets all requirements for a Class II medical device, you can rely on this resin.
Crown is available in seven shades: A1, A2, A3, B1, B3, C2 and D3. Available in US, EU, UK and EFTA.
- Biocompatible, FDA 510(k) cleared and meets all requirements for a Class II medical device
- Versatile: Use as a single crown on a natural tooth or abutment, as an inlay, onlay or veneer
- A very low water absorption reduces the tendency to age, a smooth surface means less plaque formation
SKU: SRE-0205041
